Saturday, August 21, 2010

Bisquick Dumplings - Chicken and Dumplings

Category: Breads > Quick Breads > Dumplings

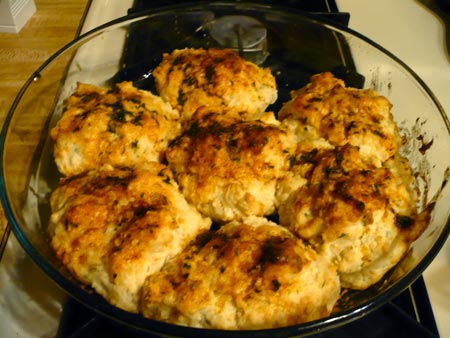
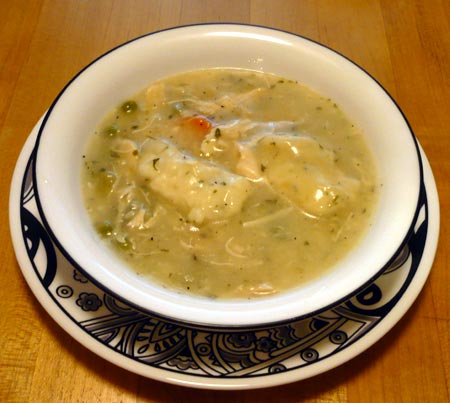
Chicken and Dumplings makes for a good lunch or dinner dish. There are many different ways to make dumplings but this recipe uses Bisquick dumplings. Yes, you might be able to tell by now that I am a fan of Bisquick!


Recipe:

  • 1 pound Boned Chicken
  • 1 cups Carrots
  • 1 medium Onion
  • 1 cup Peas
  • 1 cup Celery
  • 1 tbsp. Dried Parsley
  • 2 Chicken Bouillon Cubes
  • Salt and Pepper to taste
  • 1 tbsp. Corn Starch
  • 1-1/2 cups Bisquick
  • 1/2 cup Milk


Place uncooked chicken in a large pot. Fill pot with water until the chicken is covered. Sprinkle water with salt and pepper. Chop up the onion and add it to the pot. Bring water to a boil and then cover. Cook until chicken is done, about 1 to 1-1/2 hours.

Once the chicken is done, take the chicken out of the water (chicken broth) and remove the meat from the bones. Throw the chicken meat back into the pot with the chicken broth. Add the carrots, peas, celery, parsley, and chicken bouillon cubes to the broth. Let simmer until vegetables are cooked. Add salt and pepper if needed.

In a small bowl, mix the Bisquick and milk together. Don't over mix. Mixture should be a little runny. If mixture is too thick, you can add a little more milk. Pour mixture into the chicken pot about 1 tbsp. at a time to create the dumplings. Once you have added all the Bisquick mixture, cover pot and let cook for 10 minutes. You will know the dumplings are done when they float to the top of the pot.

The dumplings will thicken your broth but if you wish for it to be thicker, take 1 tbsp. of corn starch and mix it in a small glass with water. Pour starch/water mixture into pot and stir. Your broth will thicken.

Baking Tips:

  • The longer the chicken and dumplings sets, the thicker it will become. So allow your broth to simmer and thicken a bit before adding more corn starch.

Friday, August 20, 2010

Cheese Pastry

Category: Pastry > Savory > Cheese Pastry

A cheese pastry is a plain pastry (a dough, often used for pie crusts) that has cheese mixed with it. You can do anything you want with a cheese pastry. I took this cheese pastry and twisted them into bread-sticks. Plain pastry is not meant to raise, so these are crunchy bread-sticks.


Recipe:

  • 1 cup Bread Flour
  • 1/2 tsp. Salt
  • 2 tbsp. Butter
  • 1/8 cup Shortening
  • 1/4 cup Grated Cheese
  • 3 to 4 tbsp. Ice Cold Water


Preheat oven to 400 degrees. Sift flour and salt and place in a large bowl. With a pastry blender, cut in butter, shortening, and cheese until the butter and shortening are the size of peas. Add in water, a tablespoon at a time, until dough forms a ball.

Roll out dough between two sheets of wax paper. Cut dough into strips and twist/braid them together. Place bread-sticks on parchment-lined cookie sheet. Bake in oven for about 10 minutes until bread is nicely browned.

Baking Tips:

  • Do not over knead or mix the dough or it will become tough.
  • The less amount of water you add, the crispier and flakier the bread will come out.
  • You can brush the top of the bread-sticks with an egg wash to give them a nicer finish.

Thursday, August 19, 2010

Jello Cake

Category: Cakes > Butter Cakes > Jello Cake

One of my favorite desserts growing up was the Jello Cake. Not only did I think it was pretty (always a bright pink) but it tasted really good. Also referred to as a poke cake, a Jello Cake is a white or yellow cake that has had jello poured over it and then chilled.

Since it is a chilled dessert, it's a great dessert during the summer. The only draw back to this cake is that it requires time to make and so you need to plan ahead if you want to eat one.


The cake pictured is made with Black Cherry Jello so it is a bit darker than normal for me. I personally prefer plain cherry jello and think it makes the best jello cake.

Recipe:

  • 1 White or Yellow Cake Mix
  • 1 3 oz. Packet of Jello (Any flavor)


Bake cake according to instructions on the back of the box. Leave cake in pan and cool completely. Once the cake is cool, start the Jello. Bring one cup of water to boil and then dissolve the Jello in it. Once dissolve, add one cup cold water and stir. Poke large holes into the cake, making sure you poke all the way to the bottom. Using a skewer works well. Once holes are placed, slowly pour the jello over the cake. Allow the Jello to soak into the cake and into the holes. Chill cake for 4 hours and serve.

Baking Tips:

  • You want your holes on your cake to be large enough that the Jello will go into them.
  • Poke your holes in a uniform pattern to make the cake look nicer.
  • You can cover the cake with whipped cream if you like.
  • You want to pour the Jello slowly so the cake has time to soak up the Jello. Otherwise the Jello will fall all to the bottom of the pan.
  • For storage, you will want to keep this cake refrigerated.

Wednesday, August 18, 2010

Watermelon Cake

Category: Cakes > Decorated

A while back, my father saw this cake in a magazine and just had to have it.


I used a red velvet cake so that it would be red when you cut into it. I did a pink crumb coat to add to the redness. I then did a coat of white icing. After that I covered the sides with green and the middles with red. If I made the cake again, I would skip doing a full layer of white because it just added too much icing to the cake. The seeds are with chocolate covered raisins.


This cake was my final cake for the 1st Wilton's cake decorating class. It was a spice cake filled with apple pie filling. I prepped all the icing a day or two before class and unfortunately, the black/chocolate icing started to clump a little. So, I wasn't quite as happy with the decorations on this cake as I was hoping for. Seems my cakes always turn out better when I decorate them at home, in my own environment.


This was one of my earlier cakes and the first I tried writing on. As you can see, I needed to use a bigger tip for the writing. I used a 1 when I think a 3 would have been better. For the life of me, I can't remember what type of cake it was.

Tuesday, August 17, 2010

Homemade Vanilla Pudding

Category: Fillings > Puddings > Vanilla

Who knew that homemade pudding was so easy to make. I never did but if I knew how easy it was, I wouldn't have been purchasing store pudding mixes. Homemade pudding is as easy as any cook and serve pudding. Instance pudding is still faster but has a different taste.


Recipe:

  • 2 cups Milk
  • 1/2 cup Sugar
  • 3 tbsp. Cornstarch
  • 1/4 tsp. Salt
  • 1 tsp. Vanilla
  • 1 tbsp. Butter or Margarine


In medium saucepan stir and combine milk, sugar, cornstarch and salt. Cook and stir over medium heat until mixture thickens enough to coat the back of a metal spoon. Do not boil. Remove from heat, stir in vanilla and butter. Pour into serving dishes. Cover and chill before serving.

Baking Tips:

  • When covering, press the plastic wrap right on top of the pudding. That will help prevent a film of skin from forming.

Monday, August 16, 2010

No Bake - Key Lime Pie

Category: Pies > Sweet > Key Lime Pie

What are Key Limes? Well, they are just a specific variety of lime. This is a no bake key lime pie which can be whipped together in minutes. Taste-wise I think this key lime pie is only average, but if you are in a hurry for a dessert it works.


Recipe:

  • 2 cans Key Lime Pie Filling
  • 1 bag Graham Crackers
  • 1/4 cups Sugar
  • 1/3 cups Butter, melted


For Graham cracker crust: Crush graham crackers in a blender until very fine. Mix sugar in with the graham cracker crumbs. Pour into pie pan and then add melted butter. Mix until the mixture starts to combine and then press into the bottom and sides of the pie pan. Pour Key Lime pie filling into the crust. Best served chilled by refrigerating for 4 hours.

Baking Tips:

  • You get best results if you let your graham cracker crust sit in the refrigerator for 30 minutes before you fill it.
  • Don't press your graham cracker crust too hard to the pie pan. Doing so can make it hard to get out of the pan when you slice the pie.

Sunday, August 15, 2010

Garlic Cheese Biscuits - Red Lobster Style

Category: Breads > Quick Breads > Garlic Cheese Biscuits - Red Lobster Style

If you have never tried Red Lobster's Garlic Cheese Biscuits, you have been missing out. They are so good that if you Google them up, you will find several copycat recipes for these delicious biscuits. So, which one do you try? Well, I tried a couple and the recipe below is pretty close. So now, if I get a craving for these biscuits, I can just make 'em at home.


Recipe:
Biscuits

  • 2-1/2 cups Bisquick
  • 3/4 cups Milk
  • 4 tbsp. Cold Butter or Margarine, cut into 6 slices
  • 1/2 tsp. Garlic Powder
  • 1 cup grated Cheddar Cheese
  • 1 tsp. Parsley Flakes
  • Pinch of Salt


Brush on Top:

  • 2 tbsp. Butter or Margarine, melted
  • 1/2 tsp. Parsley Flakes
  • 1/4 tsp. Garlic Powder


Preheat oven to 400 degrees.

In a large bowl, add Bisquick, cheese, and butter. Use a pastry blender to mix until butter is the size of small peas. Measure out milk and add garlic and salt to the milk. Stir milk and then add to the Bisquick mixture. Mix until combined but don't over mix.

On an ungreased cookie sheet or pan, drop about 1/4 cup of mix for each biscuit to be baked. Bake 15 to 17 minutes until biscuits start to brown on top.

In a small bowl, mix together butter, parsley, and garlic powder. Use a pastry brush to brush the mixture on top of the biscuits.

Baking Tips:

  • You can add a little paprika to the brush on sauce to give the biscuits a browner look. Biscuits pictured have paprika on them.