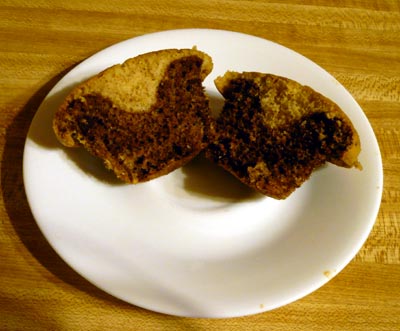
Saturday, September 11, 2010

Marble Cake

Category: Cakes > Butter > Marble Cake

So, what is a marble cake? A marble cake is a yellow/white cake mixed with a chocolate cake. They are mixed together in a swirling fashion that makes the cake resemble marble. Hence the name.

It is similar to a checkerboard cake in that it is a good choice for people who love both yellow and chocolate cake and can't make up their mind. Plus, it looks really cool with you cut into it.

Baked Marble Cake:


If you purchase a Marble Cake cake mix, you will get a packet of yellow cake mix and a smaller packet of chocolate cocoa. You make the yellow cake up like normal. Then you take a cup of the yellow cake and put it into a smaller bowl and mix the cocoa with it. You pour the yellow cake into your cake pan, spoon the chocolate batter on top of the yellow cake and then use a knife to swirl/cut/mix the two.

If you didn't have a marble cake mix, but are just dieing for a marble cake, you can mix a regular yellow cake up and just mix a cup of the batter with about 1 cup cocoa powder. Basically the same thing!

These are marble cupcakes that I covered with almond buttercream, followed by almond fondant and topped with little royal icing flowers.

Friday, September 10, 2010

Kugalhopf

Category: Cakes > Yeast > Kugalhopf

I do have a picture of my Kugalhopf but it looks a little sad so I'll forgo posting it. >< Kugalhopf is supposed to be made in a Kugalhopf pan which is a little like a bundt pan but taller and smaller in diameter. In lieu of a kugalhopf pan you can use a regular bundt pan, which I did.

I classified Kugalhopf as a cake but it could also be considered a bread.

Kugalhopf uses yeast but my kugalhopf never really rose. Either the yeast was bad or I did something wrong, I don't know which. But, the Kugalhopf still tasted good. It tastes similar to a raisen bread, not very sweet.

It is said Kugalhopf is supposed to be eaten the same day it is made. Well, we couldn't possible eat all that Kugalhopf in one day, but toasting it the next - it still tasted good.

Before I post the recipe I used, I just want to say, that to my knowledge, Kugalhopf has yeast in it. I saw many Kugalhopf recipes with no yeast! I don't think these are true Kugalhopf recipes.

Recipe:

  • 1-1/2 tsp. Active Dry Yeast
  • 2 tbsp. Warm Water (105–115°F)
  • 1 cup Milk
  • 7 tbsp. Unsalted Butter; cut into tablespoon pieces and softened
  • 6 tbsp. Sugar
  • 3-3/4 cups Flour
  • 1 tsp. Salt
  • 2 Eggs
  • 1-1/2 cups Raisins
  • 1 tsp. Lemon Zest
  • 20 Whole Blanched Almonds
  • 1 tbsp. Powdered Sugar


Stir together yeast and water in a small bowl and let stand until foamy, 5 to 10 minutes. (If mixture doesn't foam, discard and start over with new yeast.)

Butter Kugelhopf mold or bundt pan with 1 tablespoon of the butter. Put 1 almond in each depression in bottom of mold (the almonds are only decorative; you can skip them altogether if your mold has no depressions). I admit, I left the almonds out of my Kugelhopf but we all know how I feel about nuts.

Heat milk with the remaining butter and sugar over low heat, stirring, until mixture is warm (105 to 115°F), butter is melted, and sugar is dissolved.

Sift together flour and salt into bowl of standing mixer with paddle attachment. Make a well in flour and add yeast mixture. Add the warm milk mixture in a slow stream, mixing at low speed. Increase speed to medium and beat in eggs 1 at a time, then beat in raisins and zest. Continue to beat until dough is smooth and elastic, about 5 minutes. (Dough will be very sticky.)

Scrape spoonfuls of dough evenly into mold. Cover top of mold with oiled plastic wrap and a kitchen towel and let dough rise in a warm place until it fills pan, about 2 hours.

Preheat oven to 400 degrees.

Remove towel from Kugelhopf and gently peel off plastic wrap. Bake Kugelhopf in middle of oven 15 minutes, then loosely cover mold with foil and continue to bake until golden and a tester inserted in center comes out clean, 20 to 25 minutes more. Cool in pan 2 minutes, then invert cake onto a rack to cool completely, about 1 hour. Dust with confectioners sugar.

Baking Tips:

  • "Plump" your raisins before adding them to the mixture by placing them in a bowl with some water added. Cover the bowl and place in microwave for about 45 seconds until raisins are soft and puffy.
  • If you don't have a warm place to allow your Kugalhopf to rise, you can heat your oven to 200 degrees, turn it off, and let your batter sit in the oven with the door ajar.

Thursday, September 9, 2010

Halloween Cake

Category: Cakes > Butter > Decorated > Halloween Cake

I had left over fondant from the pillow cake that I wanted to use up. I decided to add some orange to the "ivory" to make a nicer orange and use it with the purple for a Halloween Cake.

I used closed cookie cutters for the cut outs on the cake. The reason they are as thick as they are is because if the fondant wasn't that thick the imprint didn't appear.

The cake itself is a devil's food cake with chocolate mint buttercream icing. The cake tastes like a Girl Scout "Thin Mint" cookie.


I still have a little purple fondant left that I'll need to find something to do with. Hmm, I also have left over almond and chocolate mint buttercream icing. Maybe I'll make up a batch of cupcakes to use all the icings up.

Wednesday, September 8, 2010

Pillow Cake

Category: Cakes > Butter > Decorated > Pillow Cake

I received a free copy of the 2010 Wilton's Yearbook because I signed up for their new cake decorating class. One of the cakes pictured was this three tiered pillow cake. It was amazingly cool. I purchased a set of the pillow pans and wanted to try my hand at making the cake. I decided to only make the smallest tier because who needs all that cake.

I have to admit, it was an ambitious cake to set out to make. It wasn't as easy as the instructions led you to believe. The seams wouldn't stay on the cake despite using a ton of toothpicks to hold it in place. The tassels wouldn't form correctly and I had problems getting them to stick as well.

I was disappointed in the shade my "ivory" fondant come out. It was more orange than ivory. I must have used too much food coloring. And the dusting powder they suggested we use to give stuff a golden shine didn't work as well as I thought it would.

Of course, having made this cake once, I learned a bunch of stuff that I should do different to make the cake look better. I also have a better idea of how the dusting powder really works, as this was my first time using it.

So, this is how it turned out. Not great, but not terrible. The fondant is an almond flavor. The buttercream underneath is also an almond flavor. The cake itself is a marble cake.


Some Tips:

  • If you purchase the pillow cake pan set, the smallest pan holds half a cake mix.
  • When you place the fondant on the top half of the pillow, make it so it over laps and covers the seam. That way, when you put your seam on the side of the cake it doesn't matter if it slips down a little bit.
  • If you mix some gumpaste with your fondant for the seams and tassels, they will hold their shape better.


I want to make this cake again but with only buttercream instead. I am curious how it would turn out!

Tuesday, September 7, 2010

Autumn / Halloween Sugar Cookies

Category: Cookies > Rolled Cookies > Sugar Cookies

Fall is coming, fall is coming - my favorite season of all! So... I decided to make some Autumn and Halloween theme sugar cookies to celebrate. The craft stores has just put out all their Halloween/Fall cooking stuff so if you are interested now is the time to pick the cute stuff up before it's all gone.

I ended up picking up some cute cookie cutters! I couldn't help myself.

Here are my cookies after I baked them but before they have been decorated:


Here are my cookies after I have glazed them. Glazing cookies is really simple and they look good just like this. If you don't want to go through all the trouble of doing the detail work, something simple like this is still really eye popping.


And here are my cookies after I put the details on them with royal icing:


Glaze Recipe:

  • 1 cup Powdered Sugar
  • 1 tbsp. Light Corn Syrup
  • 1 tbsp. Water
  • Few drops Flavoring


Mix everything up in a small bowl with a spoon. Taste your icing and add more flavoring if you want. I never add more than 1/8 tsp. of my flavoring. Your glaze should be thick so you can control it when you put it on your cookie. If your glaze is running on your cookie, it is too thin. If you let the glaze sit for a little bit, it will thicken up.

Add food coloring to the glaze for different colors.

To apply glaze to a cookie, take a spatula and place a little bit of glaze on the middle of the cookie. Use the spatula to spread the glaze around cookie. Add more glaze to the cookie as needed. Glaze will dry with a smooth shiny look in a few hours.

Royal Icing Recipe:

  • 2 cups Powdered Sugar
  • 1-1/2 tbsp. Meringue Powder
  • 3 tbsp. Water
  • 1/2 tsp. Flavoring


Make sure your mixing bowl and beaters are oil free. Place everything in your mixing bowl and beat together for 7 to 10 minutes until thick and fluffy.

You should mix in about 1 tsp. of piping gel to help the royal icing flow when you are using it for details on cookies. Add food coloring as desired for different colors.

Royal icing starts to dry out quickly so your icing should always be covered in an air tight container. Don't let it sit out.

Cookies with royal icing should be allowed to dry overnight.

Monday, September 6, 2010

Chocolate Chip Pound Cake

Category: Cakes > Butter > Pound Cake > Chocolate Chip Pound Cake

My mother found this recipe in a magazine and wanted me to make it for her. It's not quite a true pound cake since a real pound cake is a pound of egg, butter, flour, and sugar. As such, it isn't quite as dense and a little more crumbly. It tastes like a chocolate chip cookie with the texture of a cake.

It's good, but personally, I think I rather just make a real pound cake and add chocolate chips to it =)


Recipe:

  • 1-3/4 cups Flour
  • 1/4 tsp. Salt
  • 2 Eggs
  • 2 Egg Yolks
  • 1-1/2 tsp. Vanilla
  • 1-1/2 sticks Unsalted Butter
  • 1 cup Sugar
  • 3/4 cup Chocolate Chips


Preheat oven to 325 degrees. Grease and flour a 9x5x3" loaf pan.

Cream together butter and sugar until light and fluffy (about 6 minutes). Add eggs and egg yolks one at a time and mix well between each egg. Add vanilla. Mix until about 3 minutes until light and fluffy. Slowly add the flour and salt. Mix just until just blended. Stir in chocolate chips.

Pour into pan and bake for 1 hour 12 minutes or until toothpick inserted in center comes out clean. Cool in pan on wire rack for 30 minutes. Remove from pan and cool completely on the wire rack.

Sunday, September 5, 2010

August Birthday Cake

Category: Cakes > Butter > Decorated

A while back when I was talking about some cakes I made I mentioned making another cake for my father's colleague. The cake I made for my father was the chocolate covered one.

The white cake was made for a neighbor. She came by and asked if I could have a cake ready for her that evening. >< I decided to mirror this design since I didn't really have time to come up with something new at the last minute. I was working the whole day and finished just as she came by to pick the cake up! But it turned out really cute.

Both cakes are dark chocolate fudge with a chocolate mousse filling. It is a really really yummy cake. It is iced with buttercream and the covered with gumpaste flowers. The cakes are exactly the same except the colors are reversed.