Showing posts with label Butter Cakes. Show all posts

Monday, September 6, 2010

Chocolate Chip Pound Cake

Category: Cakes > Butter > Pound Cake > Chocolate Chip Pound Cake

My mother found this recipe in a magazine and wanted me to make it for her. It's not quite a true pound cake since a real pound cake is a pound of egg, butter, flour, and sugar. As such, it isn't quite as dense and a little more crumbly. It tastes like a chocolate chip cookie with the texture of a cake.

It's good, but personally, I think I rather just make a real pound cake and add chocolate chips to it =)


Recipe:

  • 1-3/4 cups Flour
  • 1/4 tsp. Salt
  • 2 Eggs
  • 2 Egg Yolks
  • 1-1/2 tsp. Vanilla
  • 1-1/2 sticks Unsalted Butter
  • 1 cup Sugar
  • 3/4 cup Chocolate Chips


Preheat oven to 325 degrees. Grease and flour a 9x5x3" loaf pan.

Cream together butter and sugar until light and fluffy (about 6 minutes). Add eggs and egg yolks one at a time and mix well between each egg. Add vanilla. Mix until about 3 minutes until light and fluffy. Slowly add the flour and salt. Mix just until just blended. Stir in chocolate chips.

Pour into pan and bake for 1 hour 12 minutes or until toothpick inserted in center comes out clean. Cool in pan on wire rack for 30 minutes. Remove from pan and cool completely on the wire rack.

Monday, August 23, 2010

Snowballs

Category: Cakes > Butter Cakes > Snowballs

No, these snowballs are not like the pink snowballs you can buy at the gas station but these are kind of similar. These snowballs are cut white cake that are covered with marshmallow frosting and coconut. Even if you don't want to add the frosting and coconut, the cake is very good.


This isn't the best picture but it was the only one I could find that I took of the snowballs.

Recipe:
Cake:

  • 1 White Cake Mix
  • 1 cup (8 oz.) Sour Cream
  • 1/2 cup Vegetable Oil
  • 3 Eggs
  • 1 tsp. Vanilla


Frosting:

  • 1 cup Sugar
  • 4 tbsp. Water
  • 4 Egg Whites
  • 14 oz. Marshmallow Creme
  • 12 oz. Grated Coconut


Preheat oven to 350 degrees. Grease and flour a 13"x9" pan.

Put the cake mix, sour creme, oil, eggs, and vanilla in a large mixing bowl. Blend with electric mixer on low speed for 1 minute. Increase speed to medium and beat for an additional 2 minutes. The batter will be thick. Pour into greased pan and place in oven. Bake for 35 to 40 minutes. Cool for 15 minutes and then remove from pan. Let continue to cool on a wire rack.

Let egg whites get to room temperature. Place sugar, water and egg whites in a medium saucepan. Cook over low heat, beating on high continuously with a hand mixer until soft peaks form. Remove pan from heat and add marshmallow creme. Beat on high speed until stiff peaks form.

Cut cake into to equal 1-1/2" squares pieces. Place the cut cake on parchment covered cookie sheets, spaced about 3/4" apartment. Pour the marshmallow icing over the cake squares and then cover them with the coconut.

Place the cookie sheets with the snowballs in the refrigerator to chill for about 30 minutes before serving.

Baking Tips:

  • Just a heads up, making theses are a little messy because of the sticky marshmallow icing.
  • Don't make the marshmallow icing until you are ready to use it. If it harden ups too much, you can warm it up over a double boiler.

Thursday, August 19, 2010

Jello Cake

Category: Cakes > Butter Cakes > Jello Cake

One of my favorite desserts growing up was the Jello Cake. Not only did I think it was pretty (always a bright pink) but it tasted really good. Also referred to as a poke cake, a Jello Cake is a white or yellow cake that has had jello poured over it and then chilled.

Since it is a chilled dessert, it's a great dessert during the summer. The only draw back to this cake is that it requires time to make and so you need to plan ahead if you want to eat one.


The cake pictured is made with Black Cherry Jello so it is a bit darker than normal for me. I personally prefer plain cherry jello and think it makes the best jello cake.

Recipe:

  • 1 White or Yellow Cake Mix
  • 1 3 oz. Packet of Jello (Any flavor)


Bake cake according to instructions on the back of the box. Leave cake in pan and cool completely. Once the cake is cool, start the Jello. Bring one cup of water to boil and then dissolve the Jello in it. Once dissolve, add one cup cold water and stir. Poke large holes into the cake, making sure you poke all the way to the bottom. Using a skewer works well. Once holes are placed, slowly pour the jello over the cake. Allow the Jello to soak into the cake and into the holes. Chill cake for 4 hours and serve.

Baking Tips:

  • You want your holes on your cake to be large enough that the Jello will go into them.
  • Poke your holes in a uniform pattern to make the cake look nicer.
  • You can cover the cake with whipped cream if you like.
  • You want to pour the Jello slowly so the cake has time to soak up the Jello. Otherwise the Jello will fall all to the bottom of the pan.
  • For storage, you will want to keep this cake refrigerated.

Thursday, August 12, 2010

Sugar Sprinkle Cake

Category: Cake > Butter Cake > Decorated


This was the cake I decorated as my final project cake for the second Wilton's Cake Decorating class. I really hate decorating cakes in class because the work area isn't very clean and it is small. As it turns out, my hand slipped in class while trying to pick the cake up for the class picture, and it ruined some of the basket-weave. I knew I would have to fix it at home. By the time I got home, the ride and the heat had caused most of the side to start to come off. So I just scrapped it all off and redid it all. Turns out the second time I did it (at home!) it turned out a million times better looking. I didn't take a picture, so this one will have to do.

The cake is a funfetti cake with 3 layers. A layer of red frosting, a layer of blue frosting, and a layer of yellow frosting. I wanted to experiment with a rainbow - gradient top. An air brush would have worked best, but since I don't have an air brush, I used colored sugar sprinkles instead. It turned out okay and makes for an interesting looking cake.

To make the color sugar sprinkles, all I did was place some caster sugar in a ziplock bag with a few drops of food color. I shook the bag around until all the dye was incorporated. Voila! Homemade sprinkles. You don't have to buy them anymore, plus you can get the exact color you want.

Tuesday, August 10, 2010

Decorated Cakes

Category: Cakes > Butter Cakes > Decorated

These are some of the first cakes I decorated. You can tell they are not very good but practice makes perfect and you get better the more you do stuff like this.


I called this my monster cake because I experimented with a bunch of different things with this cake. First, it is a yellow cake which I added 1 tbsp. raspberry extract to, to try and make it a raspberry flavored cake. I didn't think it tasted very raspberry. It had just a faint hint. Some people loved it, other didn't really taste the raspberry at all. If I was to do this again, I would add more raspberry extract to the batter.

I also added 1 tbsp. meringue powder to the batter. People claim it makes the cake fluffier and moister. I didn't notice any difference so I don't think I'll be adding any more meringue powder to my cakes.

It was layered with chocolate mousse, which I also added raspberry extract too. I love the chocolate and raspberry combination. However, I think I added too much raspberry extract to the chocolate mousse. Next time I'll only add 1/2 tsp. raspberry extract.


This cake was the tastiest of the bunch. It was a dark chocolate fudge cake with chocolate mousse layers. It was divine. I plan on making this combination again later this month. My father requested a birthday cake for one of his colleagues, who just happens to love chocolate. So this should be right up her alley.


This was the simplest cake of the bunch. It was an orange cake which I ended up giving to the neighbors. I like orange so I was excited about baking an orange flavored cake. It was good but not quite as tasty as I had hoped. I probably won't be making many more orange cakes unless requested.

Friday, August 6, 2010

Black Forest Cake

Category: Cake > Butter > Black Forest Cake

Black Forest Cake is a chocolate cake baked with kirsch. It is filled and covered with whipped cream and cherries. The top is decorated with cherries, whipped cream and chocolate curls.


Recipe:

  • 1 Chocolate Cake Mix
  • 1 Can of Cherry Pie Filling
  • 2 Cups Heavy Whipping Cream
  • 2 tbsp. Sugar
  • 1 tsp. Vanilla
  • 1 oz. Semi-Sweet Chocolate
  • 1/4 cup Kirsch


Preheat oven to 350 degrees. Mix chocolate cake mix to directions on back of box. Substitute 1/4 cup kirsch for 1/4 cup water that is called for on the cake mix box. Pour mixture in pan and bake as instructed on cake mix box.

While cake is baking, start on making the whipped cream. Place cold whipping cream in medium bowl. Whip until it starts to get foamy, about 3 minutes. Place in refrigerator, along with the mixer beaters for 15 minutes to chill.

After the whipping cream and beater are chilled, added sugar and vanilla to bowl. Whip until stiff peaks form. Placed the whipped cream back into the refrigerator until you are ready to use.

Grate the semi-sweet chocolate with a grater and set aside to use to decorate the cake later.

Once your chocolate cake is completely cool, you can torte the cake and fill with 1/4 of the whipped cream and half the can of cherry pie filling. Use the rest of the whipped cream to frost the top and sides of the cake. Place the remaining cherry pie filling on top of the cake. Sprinkle the grated chocolate on top of the cake.

Chill cake and serve. To store cake, make sure you keep it in the refrigerator.

Baking Tips:

  • The above is a very simple Black Forest Cake. You can even leave the kirsch out if you don’t have any.
  • You can make your own cherry filling and add kirsch to the cherries.
  • Instead of vanilla, you can add kirsch to the whipping cream.
  • Some recipes don’t add kirsch to the cake, but rely on kirsch in the cherry mixture and/or whipped cream.
  • It doesn’t matter what type of chocolate cake you use. Any type of chocolate cake mix will do or you can make a chocolate cake from scratch.
  • Now-a-days cake mixes are as good, if not better, than cakes made from scratch. Don’t feel like you must make a cake from scratch for it to be good.
  • You can decorate the cake however you would like. If you have to level the cake, you can crumble the dome you cut off and use it to sprinkle onto the cake.

Tuesday, August 3, 2010

German Chocolate Cake

Category: Cakes > Butter > German Chocolate Cake

Cake mixes today make very good cakes so most of the time I suggest just using a cake mix rather than making a cake from scratch. It tends to be faster, easier, and cheaper.

So for my German Chocolate Cake, I used a German Chocolate Cake mix and then made the icing. Traditionally, a German Chocolate Cake is iced with a Coconut-Pecan icing.


Recipe:

  • 1 German Chocolate Cake Mix
  • 1 cup Pecans
  • 1 cup Sugar
  • 1 cup Heavy Whipping Cream
  • 3 Large Egg Yolks, lightly beaten
  • 1/2 cup Unsalted Butter, cut into pieces
  • 1/8 tsp. Salt
  • 1-1/2 cups Sweetened Grated Coconut


For Cake, bake based on instructions on box. Let cake cool completely before you frost.

Preheat the oven to 350 degrees. Place the pecans on a baking sheet and bake for about 8-10 minutes or until lightly browned. Remove from oven, let cool, and then coarsely chop.

You can bake a few extra pecans if you want to use them to decorate the cake.

In a medium saucepan, combine the sugar, milk, egg yolks, butter, and salt. Cook over medium heat, stirring constantly, and when the mixture begins to boil and thicken, remove from heat. Stir in the chopped pecans, coconut, and vanilla extract. Let cool until spreadable. You can place in refrigerator to cool faster.

Baking Tips:

  • If you are going to have more than one layer of icing in the cake, you might want to double the icing recipe.
  • Dark Chocolate Icing is often used for a border on German Chocolate Cakes.

Wednesday, July 28, 2010

Sesame Street Count Cake

Category: Cakes > Butter > Decorated > Sesame Street Count Cake

If you are looking for an easy way to wow people, baking a cake in a novelty pan and decorating it is a good way to go. Novelty cake pans come in all sorts of shapes like flowers or popular cartoon characters.

A novelty pan usually takes one cake mix and can be decorated using a star tip. You cover the cake all in little stars. It takes a little time to cover the whole cake but the benefits are that making the little stars are easy and the cake will look good regardless of how well the stars are formed.


What you Need:

  • Novelty Cake Pan
  • 1 Cake Mix
  • Cake Board
  • Medium Consistency Buttercream Icing
  • Food Coloring
  • Pastry Bags
  • Star Tip (size 16,18, or 21)


Grease and flour the cake pan. Mix up the cake mix based on the instructions on the box, pour into the cake pan, and bake. Let the baked cake cool about 15 minutes in the pan before you remove. Let cake cool completely, design side up, on a cooling rack. Once it is cool, you can transfer it to the cake board. Use the food coloring to color the buttercream icing as you need. Fill your pastry bag with the icing and put the star tip on the bag. Now you are ready to start filling in your cake with the icing.

Tips:

  • Make sure you grease and flour your cake pan really well so that it comes out clean.
  • When you first make buttercream icing, it will be stiff consistency (if you stick a knife in it, it will not move). Add a few drops of water and mix the icing to get a medium consistency. You will know it is medium consistency when you can stick a knife in it and it moves, but does not fall, when you shake the bowl. If you add too much water, you can add some powdered sugar to make it stiffer.
  • Try to place your stars close enough together so you don't have gaps and see the cake underneath.
  • Filling in your cake in star rows will help give your cake a better look.
  • If you put a dab of icing on your cake broad and then place the cake on top, your cake will not move around on the broad.

Tuesday, July 27, 2010

Banana Chiffon Cake

Category: Cakes > Foam Cakes > Chiffon

A chiffon cake is different from other foam cakes because it contains a fat - vegetable oil. Chiffon cakes usually have light flavoring so rich icings or toppings work well. This is a Banana Chiffon cake with a Banana Buttercream icing.


Recipe (Chiffon Cake):

  • 2 cups Flour
  • 1-1/2 cups Sugar
  • 1 tbsp. Baking Powder
  • 1 tsp. Salt
  • 1 large Ripe Banana
  • 1/2 cup Vegetable Oil
  • 7 large Eggs, separated
  • 1 tsp. Vanilla
  • 1/2 tsp. Almond Extract
  • 3/4 cup Cold Water
  • 1/2 tsp. Cream of Tartar


Icing:

  • 1 Ripe Banana
  • 1/2 cup Butter
  • 1 tsp. Vanilla
  • 1 pound (4 cups) Powdered Sugar
  • Milk
  • Pinch of Salt


Preheat oven to 350 degrees. Sift together the flour, sugar, baking powder and salt and place in large mixing bowl. Mash the banana and add it to the flour mixture. Next add the oil, egg yolks, vanilla and almond extracts and the cold water. Whisk together until the batter is smooth.

In a different large mixing bowl, beat egg whites and cream of tartar with an electric mixer until stiff peaks form.

With a rubber spatula, gently fold the beaten egg whites into the batter just until combined – it is important not to over-mix at this step. Pour batter into an ungreased 10” angel food cake pan. Bake about 55 minutes, or until a toothpick inserted into the center of the cake comes out clean.

Invert pan over a cooling rack. Allow cake to cool completely in this upside down position before removing from the pan.

While the cake is baking you can mix the icing. Add the banana to a mixing bowl and mash. Add vanilla, a pinch of salt and butter. Cream together with the banana. Beat in the powdered sugar. If you need more liquid, add milk a tsp. at a time as needed. However, the banana provided a lot of liquid and you might not need to add any milk.

Once the cake is cool, you can ice it with the banana icing.

Baking Tips:

  • Adding the salt to the icing helps cut down on some of the sweetness. You can add less or more to your taste.
  • When adding salt to icing, you should place the salt in a liquid you need to add to the icing instead of just sprinkling the salt into the icing. That way you make sure to distribute the salt evenly.
  • You need to start baking the cake as soon as the batter is finished being mixed so the air in the eggs don't start to escape.
  • Because a chiffon cake is a foam cake, don't bang the batter around or it might not rise properly.
  • Because of the banana, your icing will be a bit glaze like. You can add a tsp. of meringue powder to the icing to make it a little stiffer.

Friday, July 23, 2010

Black Bottom Cake

Category: Cakes > Butter > Black Bottom Cake

A black bottom cake is based on a black bottom pie but it is different. A black bottom cake has a chocolate cake bottom and is topped with cream cheese which is mixed with chocolate chips. The cake is often topped with shaved chocolate. Black bottom cupcakes are popular.

When I first decided to try a black bottom cake, I expected that it would be a thin layer of chocolate with a top layer of cheese cake. However, when I followed the recipe, I found that there wasn't enough cheese cake to create a layer. Instead the cheese cake was meant to be marbled in with the chocolate.

Even though the cake was tasty, I do want to make modifications to the recipe to remake the cake in what I feel will be a better manner.


Recipe:
Cake:

  • 1-1/2 cups Flour
  • 1 cup Sugar
  • 1/4 cup Cocoa Powder
  • 1/2 tsp. Salt
  • 1 tsp. Baking Soda
  • 1 cup Water
  • 1/3 cup Vegetable Oil
  • 1 tbsp. Vinegar
  • 1 tsp. Vanilla


Filling:

  • 1 (8 oz.) pkg. Cream Cheese
  • 1 Egg
  • 1/3 cup Sugar
  • 1/8 tsp. Salt
  • 1 cup Chocolate Chips


Preheat oven to 350 degrees. Grease and flour a 9" x 13" pan. Sift together flour, sugar, cocoa powder, baking soda and salt. Add water, oil, vinegar and vanilla. Pour into pan.

Cream together cream cheese, egg, salt, sugar. Add the chocolate chips. Drop by teaspoonfuls onto top of batter in pan. Bake 30 minutes.

Baking Tips:

  • You won't have enough cream cheese to cover the whole cake so you will probably want to drop it in a checkerboard pattern.
  • I want to make this cake again, but I want to use a 9" round instead and double the amount of cream cheese filling which I hope will give me a clean layer of cheese cake on top.
  • The chocolate cake will rise while baking.
  • If you want your cheese cake to not be tinted with brown from the chocolate cake, once you drop it on the cake, do not smooth or move it around.
  • The chocolate chips made the cake really rich. If you want, you can leave them out.
  • You can top the cake with walnuts, powdered sugar, cream cream frosting, or shaved chocolate. I chose not to top the cake with anything and ate them more like brownies.

Thursday, July 15, 2010

Checkerboard Cake

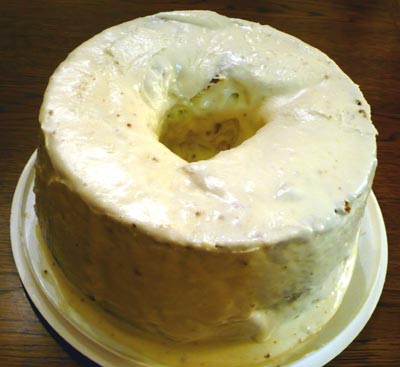
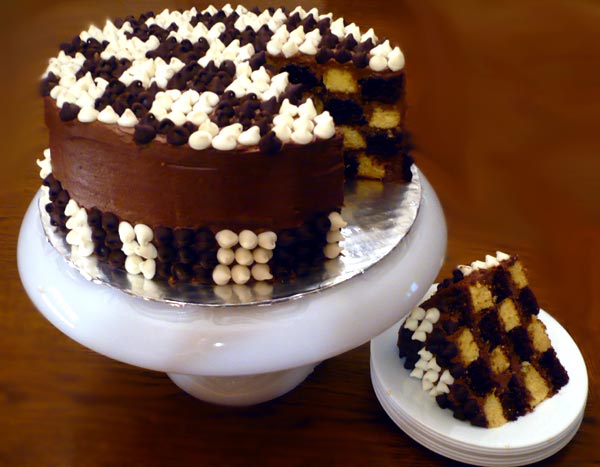
Categories: Cakes > Butter > Checkerboard Cake

At its core, a checkerboard cake is nothing but a cake, that when sliced into, resembles a checkerboard. It is nice for the wow factor, plus, if you have someone who can't decide which, between two types of cakes, to have - why not have them both with a checkerboard cake!


There are several different ways to make a checkerboard cake. The most common method is with a checkerboard cake pan set. This set includes 3 round cake pans and a plastic insert divided into 3 rings. You pipe alternating cake mix flavors or colors into the rings, remove the insert, and repeat with the next pan. However if you piped white, chocolate, white in the first pan, you would pipe chocolate, white, chocolate in the next. Keep in mind that you need thick batter so it doesn't start to bleed over when you remove the insert.

A second method of making a checkerboard cake is just like the first except you make a make-shift insert with cardboard covered in plastic wrap or contact paper. You can also make an insert for a square pan.

Another method involves simply piping the batter into a pan without an insert. With this method you will not get as straight a line but will work for the general effect. If you are looking for something a little wacky, this method works well.

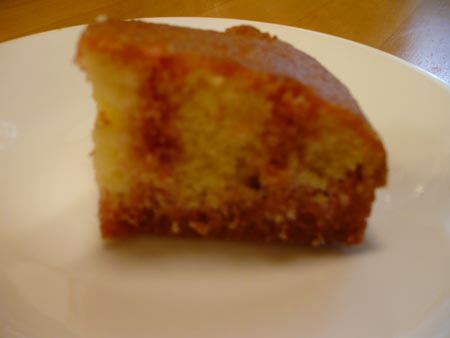
The last method involves cutting two different colored or flavor cakes up and piecemealing them back together. This method is easier for square cakes than circles but still works well. If you cut you pieces with exact measurements, they should fix together almost like a glove. This is the method I used.

Recipe:

  • 1 Chocolate Cake Mix
  • 1 Yellow Cake Mix

For Chocolate Buttercream Icing:

  • 1 cup Shortening
  • 1 pound Powdered Sugar
  • 3/4 cups Cocoa Powder
  • 8 to 9 tbsp Water
  • 1 tsp. Vanilla
  • 1 tbsp. Meringue Powder


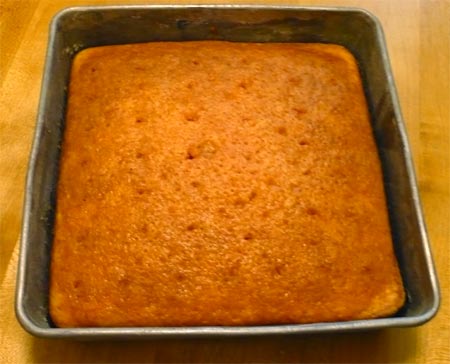
Follow the baking instructions on the cake mix box and bake each batch in 2 circle cake pan. Let the cakes cool. You should have 4 cakes when you are finished.

While the cakes are cooling, you can make the chocolate buttercream icing. Cream together shortening, water, and vanilla. Slowly add the rest of the ingredients and mix together on medium until thoroughly combined. If you want, you can add a pinch of salt, dissolved in the water, to cut some of the sweetness down.

To Assemble:

Measure the shortest height of all the 4 cakes. Level all four cakes to be that height. Stack one white and one chocolate cake together. Make sure the cake with the biggest circumference is on the bottom. Make sure the cake on the top is centered on the cake on the bottom.

It is best to cut rings out with the two cakes stacked together. That way you know your rings will be the same size and will fix back together tightly. With a serrated knife, cut at least 3 rings out with about a 2" width. You can cut out more rings if you would like but the smaller your rings are in width, the harder it is to cut them.

Once you have the rings cut out, reassemble them in alternating colors like shown below.


Once you have assembled the cakes, you will want to stack them 1, 2, 1, 2 with a thin layer of chocolate buttercream icing between each layer to make them stick. Use the remaining icing to frost the cake. You can decorate it however you would like. I chose to cover with white and bittersweet chocolate chips in a checkerboard pattern.

Saturday, July 10, 2010

Pound Cake

Category: Cakes > Butter Cakes > Pound Cake

I like pound cake. It is a heavy and dense cake with a rich taste. Plus, it's a lot easier to make than a foam cake. The pound cake got its' names because it contains one pound each of flour, sugar, butter, and eggs. Now-a-days pound cakes can include different flavorings and additives like nuts or chocolate chips.

This is a Cream Cheese pound cake I made. It's pretty close to a traditional pound cake except it substitutes some cream cheese for some butter and has vanilla added.


Recipe:

  • 2 cups Butter, softened
  • 8 oz. Cream Cheese
  • 3 cups Sugar
  • 2-1/2 cups + 2 tbsp. Flour
  • 6 Eggs
  • 2 tbsp. Vanilla


Grease and flour a 10" bundt pan. Preheat oven at 325 degrees. Whip butter and cream cheese together in large mixing bowl. Gradually add sugar and beat until thoroughly combined. Add eggs, one at a time, beating until well mixed. Add vanilla. Blend in flour gradually. Pour batter into the pan and bake for 1 hour to 1 hour 15 minutes. Cool 15 minutes then remove from pan.

Baking Tips:

  • Make sure you take extra time and grease and flour your bundt pan well so you get a nice shape when you remove the cake.
  • If the top of the cake is getting too brown but the cake isn't finished baking, cover the top with aluminum foil while it finishes.