Showing posts with label Recipes. Show all posts

Friday, September 10, 2010

Kugalhopf

Category: Cakes > Yeast > Kugalhopf

I do have a picture of my Kugalhopf but it looks a little sad so I'll forgo posting it. >< Kugalhopf is supposed to be made in a Kugalhopf pan which is a little like a bundt pan but taller and smaller in diameter. In lieu of a kugalhopf pan you can use a regular bundt pan, which I did.

I classified Kugalhopf as a cake but it could also be considered a bread.

Kugalhopf uses yeast but my kugalhopf never really rose. Either the yeast was bad or I did something wrong, I don't know which. But, the Kugalhopf still tasted good. It tastes similar to a raisen bread, not very sweet.

It is said Kugalhopf is supposed to be eaten the same day it is made. Well, we couldn't possible eat all that Kugalhopf in one day, but toasting it the next - it still tasted good.

Before I post the recipe I used, I just want to say, that to my knowledge, Kugalhopf has yeast in it. I saw many Kugalhopf recipes with no yeast! I don't think these are true Kugalhopf recipes.

Recipe:

  • 1-1/2 tsp. Active Dry Yeast
  • 2 tbsp. Warm Water (105–115°F)
  • 1 cup Milk
  • 7 tbsp. Unsalted Butter; cut into tablespoon pieces and softened
  • 6 tbsp. Sugar
  • 3-3/4 cups Flour
  • 1 tsp. Salt
  • 2 Eggs
  • 1-1/2 cups Raisins
  • 1 tsp. Lemon Zest
  • 20 Whole Blanched Almonds
  • 1 tbsp. Powdered Sugar


Stir together yeast and water in a small bowl and let stand until foamy, 5 to 10 minutes. (If mixture doesn't foam, discard and start over with new yeast.)

Butter Kugelhopf mold or bundt pan with 1 tablespoon of the butter. Put 1 almond in each depression in bottom of mold (the almonds are only decorative; you can skip them altogether if your mold has no depressions). I admit, I left the almonds out of my Kugelhopf but we all know how I feel about nuts.

Heat milk with the remaining butter and sugar over low heat, stirring, until mixture is warm (105 to 115°F), butter is melted, and sugar is dissolved.

Sift together flour and salt into bowl of standing mixer with paddle attachment. Make a well in flour and add yeast mixture. Add the warm milk mixture in a slow stream, mixing at low speed. Increase speed to medium and beat in eggs 1 at a time, then beat in raisins and zest. Continue to beat until dough is smooth and elastic, about 5 minutes. (Dough will be very sticky.)

Scrape spoonfuls of dough evenly into mold. Cover top of mold with oiled plastic wrap and a kitchen towel and let dough rise in a warm place until it fills pan, about 2 hours.

Preheat oven to 400 degrees.

Remove towel from Kugelhopf and gently peel off plastic wrap. Bake Kugelhopf in middle of oven 15 minutes, then loosely cover mold with foil and continue to bake until golden and a tester inserted in center comes out clean, 20 to 25 minutes more. Cool in pan 2 minutes, then invert cake onto a rack to cool completely, about 1 hour. Dust with confectioners sugar.

Baking Tips:

  • "Plump" your raisins before adding them to the mixture by placing them in a bowl with some water added. Cover the bowl and place in microwave for about 45 seconds until raisins are soft and puffy.
  • If you don't have a warm place to allow your Kugalhopf to rise, you can heat your oven to 200 degrees, turn it off, and let your batter sit in the oven with the door ajar.

Tuesday, September 7, 2010

Autumn / Halloween Sugar Cookies

Category: Cookies > Rolled Cookies > Sugar Cookies

Fall is coming, fall is coming - my favorite season of all! So... I decided to make some Autumn and Halloween theme sugar cookies to celebrate. The craft stores has just put out all their Halloween/Fall cooking stuff so if you are interested now is the time to pick the cute stuff up before it's all gone.

I ended up picking up some cute cookie cutters! I couldn't help myself.

Here are my cookies after I baked them but before they have been decorated:


Here are my cookies after I have glazed them. Glazing cookies is really simple and they look good just like this. If you don't want to go through all the trouble of doing the detail work, something simple like this is still really eye popping.


And here are my cookies after I put the details on them with royal icing:


Glaze Recipe:

  • 1 cup Powdered Sugar
  • 1 tbsp. Light Corn Syrup
  • 1 tbsp. Water
  • Few drops Flavoring


Mix everything up in a small bowl with a spoon. Taste your icing and add more flavoring if you want. I never add more than 1/8 tsp. of my flavoring. Your glaze should be thick so you can control it when you put it on your cookie. If your glaze is running on your cookie, it is too thin. If you let the glaze sit for a little bit, it will thicken up.

Add food coloring to the glaze for different colors.

To apply glaze to a cookie, take a spatula and place a little bit of glaze on the middle of the cookie. Use the spatula to spread the glaze around cookie. Add more glaze to the cookie as needed. Glaze will dry with a smooth shiny look in a few hours.

Royal Icing Recipe:

  • 2 cups Powdered Sugar
  • 1-1/2 tbsp. Meringue Powder
  • 3 tbsp. Water
  • 1/2 tsp. Flavoring


Make sure your mixing bowl and beaters are oil free. Place everything in your mixing bowl and beat together for 7 to 10 minutes until thick and fluffy.

You should mix in about 1 tsp. of piping gel to help the royal icing flow when you are using it for details on cookies. Add food coloring as desired for different colors.

Royal icing starts to dry out quickly so your icing should always be covered in an air tight container. Don't let it sit out.

Cookies with royal icing should be allowed to dry overnight.

Wednesday, September 1, 2010

Spookay Bouquet

Category: Rolled Cookies > Sugar Cookies > Cookie Bouquets

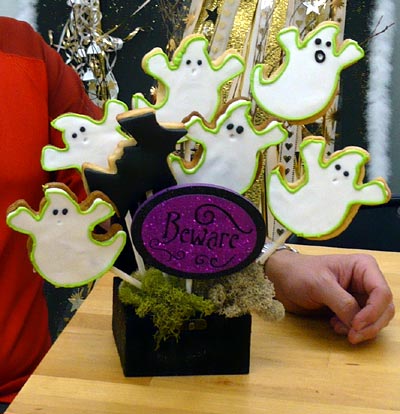
A while back I signed up for a cookie bouquet making class. Autumn is my favorite season so I really wanted to do a bouquet with a Halloween theme. My brother dubbed my idea the "Spookay Bouquet". Isn't that cute? So I stuck with it.

The Spookay Bouquet:


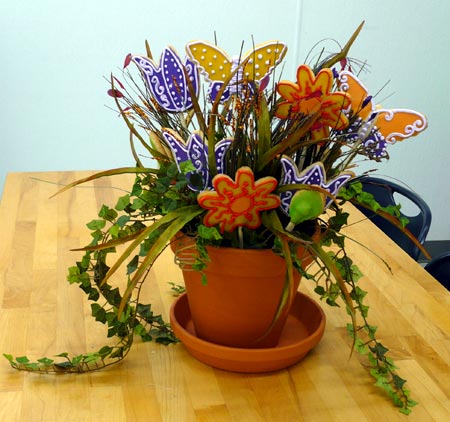
This is the bouquet my mother made.

Flower Bouquet:


We used crumbed up chocolate cake for dirt and put little gummy worms in it.

Flower Bouquet's "Dirt":


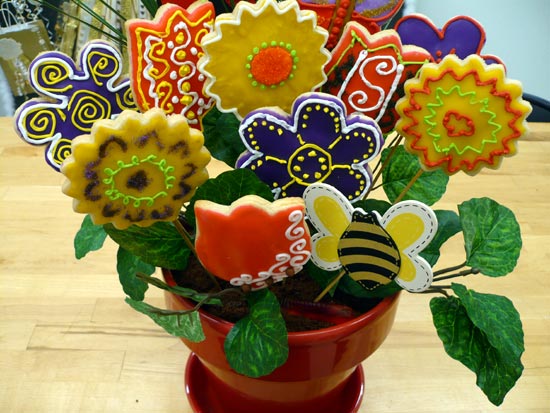
Theses are other bouquets that were made by other people in the class.

Floral Bouquet:


Ghost/Halloween:


Shoes:


We decorated the cookies with a glaze, fondant, and royal icing.

Sugar Cookie Recipe:

  • 1 cup Butter; softened
  • 1 cup Sugar
  • 1 Egg
  • 1 tsp. Vanilla (or flavoring of choice)
  • 1/2 tsp. Baking Powder
  • 1/2 tsp. Salt
  • 3 cups Flour


In a mixing bowl, cream together butter and sugar. Beat in egg and vanilla. Sift together flour, salt, and baking powder. Add flour slowly mixing well. Blend the last of the flour by hand.

You don't need to chill the dough. When ready, roll out dough 1/4" thick and cut out desired shapes with cookie cutters. A trick is to roll out your dough between two pieces of parchment paper. It keeps things cleaner. Preheat oven to 350 degrees.

Place cookie cut outs on parchment lined cookie sheets. If making a cookie bouquet, place cookies upside down on the cookie sheet. Press a stick, like a skewer, into the cookie. Make sure you place the stick high enough to cover about 3/4 of the cookie. Cover stick with a little bit of cookie dough, pressing the cookie and the little piece of cookie dough firmly together. Place cookie sheet in freezer for about 5 minutes. Flip cookies over so they are right side up. Bake 8 to 10 minutes until done. Let chill on wire rack.

Once cookies are cool, you can decorate as desired.

Baking Tips:

  • If you decide to make a cookie bouquet after you baked the cookies, you can add sticks to the cookies by using royal icing to "glue" the stick to the cookies.

Tuesday, August 31, 2010

Pumpkin Fudge

Category: Candy > Fudge > Pumpkin Fudge

Continuing on with the pumpkin theme, I made some pumpkin fudge. Again, it you are not a fan of pumpkin, you might want to skip this recipe. Otherwise, you'll probably like it.


Recipe:

  • 3 cups Sugar
  • 1 cup Milk
  • 3 tbsp. Light Corn Syrup
  • 1/2 cup Pumpkin Puree
  • 1/4 tsp. Salt
  • 3/4 tsp. Cinnamon
  • 1/4 tsp. Ginger
  • 1/4 tsp. Nutmeg
  • 1-1/2 tsp. Vanilla
  • 1/2 cup Butter


Butter a 8x8" pan and set aside.

In a 3 quart saucepan, mix together sugar, milk, corn syrup, pumpkin and salt. Bring to a boil over high heat, stirring constantly. Reduce heat to medium and continue boiling. Do not stir.

When mixture registers 232 degrees on candy thermometer remove pan from heat. Allow to cool to 150 degrees and stir in spices, vanilla, and butter.

Beat mixture until it is very thick and loses some of its gloss. Quickly pour into a greased pan. When firm, cut into pieces and serve.

Baking Tips:

  • Remember to use a wooden spoon so it doesn't melt.

Monday, August 30, 2010

Pumpkin Mousse

Category: Fillings > Mousse > Pumpkin Mousse

I like pumpkin so when I came across a recipe for pumpkin mousse, I really wanted to try it. It tasted alright, a little like pumpkin pie. However, it wasn't as firm as I thought a mousse should be. It actually tasted a little like a pumpkin flavored whipped cream.


After serving it by itself, I ended up making a ginger snap pie crust and using the left over pumpkin mousse as a pie filling. Overall, if you are a fan of pumpkin, I'd suggest trying this recipe. If not, I was pass.


Recipe:

  • 1 (15-ounce) can Pumpkin
  • 3 cups Heavy Cream
  • 3/4 cup Sugar
  • 1/2 tsp. Cinnamon
  • 1/4 tsp. Ginger
  • 1/4 tsp. Nutmeg
  • 1 tbsp. Vanilla


Combine pumpkin, 1 cup cream, sugar and spices in a medium saucepan. Simmer over medium heat for 5 minutes. Cool fully.

Whip remaining heavy cream and vanilla to soft peaks and fold into cooled pumpkin mixture. Pour into a serving dish and chill for at least 1 hour before serving.

Sunday, August 29, 2010

Zucchini Bread

Category: Breads > Quick Breads > Zucchini Bread

The first time I heard of zucchini bread, it sounded gross to me. My mother said it was good and promised to make me some to try. I was willing to give it a shot and I am glad I did. It was delicious. I ended up freezing some of it, so it wouldn't go bad, and pulling it out and toasting it when I wanted some. Very yummy!


Recipe:

  • 1-1/2 cups Flour
  • 3/4 tsp. Ground Cinnamon
  • 1/2 tsp. Baking Soda
  • 1/4 tsp. Salt
  • 1/4 tsp. Baking Powder
  • 1 cup Sugar
  • 1 cup shredded unpeeled Zucchini
  • 1/4 cup Cooking Oil
  • 1 Egg


Preheat oven to 350 degrees. Grease and flour a 8x4x2" loaf pan.

In a mixing bowl combine, sugar, zucchini, cooking oil, and egg. Mix well. Sift flour, cinnamon, baking soda, salt, and baking powder over the mixing bowl. Stir just until combined.

Pour batter into greased pan and bake for 55 to 60 minutes. Cool for 10 minutes on a wire rack and then remove from pan.

Baking Tips:

  • Remember, as with all quick breads, don't over mix. It will cause the bread not to rise or be tough.

Saturday, August 28, 2010

Pizza

Category: Breads > Yeast > Pizza

It is always pretty cool when you make your own pizza from scratch. It's not hard to do but takes a little time to allow the dough to rise. If you are planning on making pizza from scratch, make sure to leave yourself plenty of time. Or, you can make your crust up ahead of time, freeze it, and pull it out when you are ready to use.


Recipe:

  • 2 tsp. Yeast
  • 7/8 cup Lukewarm Water
  • 2 tbsp. Olive Oil
  • 3 cups Flour
  • 1-1/4 tsp. Salt


Dissolve yeast with a pinch of sugar, in 2 tablespoons of the lukewarm water (about 105 degrees). Let the yeast and water sit at room temperature for 15 minutes, until the mixture has bubbled and expanded. If yeast doesn't bubble discard it and start over with different yeast.

Combine the dissolved yeast with the remainder of the ingredients. Mix and knead everything together using the bread hook attachment until you've made a soft, smooth dough. It should take 4 to 5 minutes at second speed, and the dough should barely clean the sides of the bowl, perhaps sticking a bit at the bottom. Don't over-knead the dough; it should hold together, but can still look fairly rough on the surface.

Place dough in a grease bowl and cover. Let sit 90 minutes until puffy. Use dough for one large pizza or divide dough in half for two smaller pizzas.

In pan, spray with non-stick cooking spray and drizzle with olive oil. Place the dough in the prepared pan(s). Press it over the bottom of the pan, stretching it towards the edges. You'll probably get about two-thirds of the way there before the dough starts shrinking back; walk away for 15 minutes. Cover the dough while you're away, so it doesn't dry out.

When you come back, you should be able to pat the dough closer to the corners of the pan. Repeat the rest and dough-stretch one more time, if necessary; your goal is to get the dough to fill the pan as fully as possible.

Allow the dough to rise, covered, till it's noticeably puffy, about 90 minutes Towards the end of the rising time, preheat the oven to 450 degrees.

Bake the pizza on the lower oven rack till it looks and feels set on top and is just beginning to brown around the edge of the crust, but is still pale on top. This will take about about 10 to 12 minutes.

Top pizza how you like and then place it back in the oven, on the top rack, for an additional 10 to 15 minutes until dough is browned and cheese is melted. Let cool on metal rack and serve.

Baking Tips:

  • Store brought spaghetti sauce makes a good tomato base for your pizza.
  • If you want to freeze the crust for later use, after you bake the crust for the first time (before you put the toppings on) cool, wrap well, and freeze.

Monday, August 23, 2010

Snowballs

Category: Cakes > Butter Cakes > Snowballs

No, these snowballs are not like the pink snowballs you can buy at the gas station but these are kind of similar. These snowballs are cut white cake that are covered with marshmallow frosting and coconut. Even if you don't want to add the frosting and coconut, the cake is very good.


This isn't the best picture but it was the only one I could find that I took of the snowballs.

Recipe:
Cake:

  • 1 White Cake Mix
  • 1 cup (8 oz.) Sour Cream
  • 1/2 cup Vegetable Oil
  • 3 Eggs
  • 1 tsp. Vanilla


Frosting:

  • 1 cup Sugar
  • 4 tbsp. Water
  • 4 Egg Whites
  • 14 oz. Marshmallow Creme
  • 12 oz. Grated Coconut


Preheat oven to 350 degrees. Grease and flour a 13"x9" pan.

Put the cake mix, sour creme, oil, eggs, and vanilla in a large mixing bowl. Blend with electric mixer on low speed for 1 minute. Increase speed to medium and beat for an additional 2 minutes. The batter will be thick. Pour into greased pan and place in oven. Bake for 35 to 40 minutes. Cool for 15 minutes and then remove from pan. Let continue to cool on a wire rack.

Let egg whites get to room temperature. Place sugar, water and egg whites in a medium saucepan. Cook over low heat, beating on high continuously with a hand mixer until soft peaks form. Remove pan from heat and add marshmallow creme. Beat on high speed until stiff peaks form.

Cut cake into to equal 1-1/2" squares pieces. Place the cut cake on parchment covered cookie sheets, spaced about 3/4" apartment. Pour the marshmallow icing over the cake squares and then cover them with the coconut.

Place the cookie sheets with the snowballs in the refrigerator to chill for about 30 minutes before serving.

Baking Tips:

  • Just a heads up, making theses are a little messy because of the sticky marshmallow icing.
  • Don't make the marshmallow icing until you are ready to use it. If it harden ups too much, you can warm it up over a double boiler.

Sunday, August 22, 2010

Bagels

Category: Breads > Yeast Breads > Bagels

Bagels are a unique bread in that they are boiled and then baked. They are easy enough to purchase but they are pretty fun to make on your own and yummy.


Recipe:

  • 4 cups Bread Flour
  • 1 tbsp. Sugar
  • 1-1/2 tsp. Salt
  • 1 tbsp. Vegetable Oil
  • 2 tsp. Instant Yeast
  • 1-1/4 cups of Warm Water
  • 1 tbsp. Baking Soda


Mix all ingredients in a bowl. The dough should feel stiff but if you can't incorporate all the flour you can add a tad bit more water.

Use a mixer with the dough hook and knead for about 10 minutes or until the dough is uniform and smooth.

Cut the dough into 8 equal sized balls and let rest for 10-20 minutes.

Preheat your oven to 425 degrees. Take each ball and roll it into snakes. When the snake is a bit longer than the width of your two hands, wrap it around one hand and use your palm to attach the two ends together to form a doughnut shape.

Let your bagels rest for about 20 minutes. In the meantime, bring a pot of water to boil and add the baking soda to the water. Also, grease a large baking tray or cookie sheet.

Once you bagels look puffy, place each one in the boiling water. Boil for about a minute and then turn them over and boil them for another minute. Your bagels will expand in the water. Take them out and let dry for a minute and then place them on your baking tray.

Put the tray in the oven, and after 10 minutes, flip the bagels over and bake for another 10 minutes. Let cool on a wire rack for 20 minutes.

Baking Tips:

  • Bush an egg wash on top of the bagels before you place in oven to give them a darker, more finished look.
  • If you want to add seeds, like sesame seeds, to the top of the bagels, dip the bagel in the seeds after you take it out of the boiling water.
  • If you want to add raisins, blueberries, or anything else to the bagels, do so towards the end of kneading the dough.
  • You can also place corn meal on your baking tray to help the bagels from sticking to the pan.

Friday, July 30, 2010

Peanut Brittle

Category: Candy > Nuts > Peanut Brittle

I just want to state, for the record, that all the recipes I post have been tested by myself. Which is more than I can say for about half the recipes posted online. If you have a recipe from a cook book vs. a recipe online and don't know which to go with, go with the one in a published cook book.

Recipes posted online don't need to be verified by anyone. I'm not saying people intentionally post bogus recipes but one typo is all it takes to make a wonderful recipe turn sour.

Why am I saying this? Well for one thing, I don't want people to get frustrated if they try a new dish and it comes out bad. It probably isn't that you did something wrong, it might be the recipe. The second reason is because I chose to follow a poorly written peanut brittle recipe that forced me to trash my first batch and start all over. Something that would never had happened if the recipe I followed was a tad bit better written.

So, what went wrong with my peanut brittle? Well, in order to make peanut brittle you have to boil the mixture to 300 degrees. Needless to say, that is very hot. I was stirring my mixture with a plastic spoon, I always use plastic spoons, and was horrified when it started to melt all into the mixture. I felt like an idiot for not thinking ahead that the spoon might melt, but was more upset that the recipe I was following didn't take 2 seconds to say to use a metal or wooden spoon. It really is little things like that that distinguish a well written recipe from a poorly written one.

In the end though, my second batch of peanut brittle turned out really well and was gone before I knew it.


Recipe:

  • 1 cup Sugar
  • 1/2 cup Light Corn Syrup
  • 1/4 tsp. Salt
  • 1/4 cup Water
  • 1-1/2 cups Unsalted Peanuts
  • 2 tbsp. Softened Unsalted Butter
  • 1 tsp. Baking Soda
  • 1 tbsp. Butter


You will need a candy thermometer to make peanut brittle.

Take the 1 tbsp. Butter and use it to grease a cookie sheet. Set cookie sheet aside. Measure out the Baking Soda and 2 tbsp. Butter and set it aside, ready to use in the future. In a 2 quartz sauce pan, add the sugar, corn syrup, salt, and water. Over medium heat, stir mixture until sugar is dissolved and bring to a boil.

Once your mixture is boiling, set the candy thermometer in place. Make sure the tip of the thermometer is not touching the bottom of the pan or your reading will be inaccurate. Once you reach 200 degrees, stir in the peanuts.

Using a metal or wooden spoon, stir frequently until temperature reaches 300 degrees. You want to stir it frequently so the mixture and peanuts do not burn. Turn the heat up to medium-high or high-low to help you get to 300 degrees which will take a while.

Once you reach 300 degrees, remove from heat and immediately stir in the butter and baking soda that you had set aside. When you add the baking soda, the mixture will foam up. You only need to stir it a little bit. Quickly pour the mixture onto the cookie sheet. You can tilt the cookie sheet to help it spread a little bit but you don't want to take anything and spread it yourself. Doing so will deflate the air bubbles and make less crunchy peanut brittle.

Allow the peanut brittle to cool, about 1 hour, and then snap it into pieces. Enjoy.

Baking Tips:

  • You can substitute a little bit of dark corn syrup for the light corn syrup to make the peanut brittle darker.
  • When breaking the peanut brittle apart, be careful. The peanut brittle can be a little sharp.
  • A lot of recipes call for Karo syrup. Karo is a name brand for corn syrup. If a recipe calls for Karo, you can use any corn syrup.
  • You must reach 300 degrees. If you don't, your peanut brittle will not turn out right, which is why having a candy thermometer is so important.

Wednesday, July 21, 2010

Choux Pastry and Cream Puffs

Category: Pastries > Cream Puffs

You might think that cream puffs would be hard to make because of the dough, but I was surprised how easy it was to make these. In fact, it is probably one of the easier doughs to make.


Recipe:

Dough-

  • 1/2 cup Flour
  • 1/2 tsp. Sugar
  • 1/4 tsp. Salt
  • 4 tbsp. Unsalted Butter
  • 1/2 cup Water
  • 2 large Eggs, lightly beaten


Egg Wash-

  • 1 large Egg
  • 1/8 tsp. Salt


Whipped Cream-

  • 1 cup Heavy Whipping Cream
  • 1/2 tsp. Vanilla Extract
  • 1 tbsp. Sugar


Preheat oven to 400 degrees. Line a baking sheet with parchment paper. In a bowl sift together flour, sugar, and salt. Place butter and water in a saucepan over medium heat. Bring to a boil. Remove from heat and quickly add the flour mixture. Return to heat and stir constantly until the dough comes away from the sides of the pan and forms a thick smooth ball (about 2 minutes). Transfer dough to electric mixer and beat on low speed a minute or two to release the steam from the dough.

While the dough cools, make the egg wash. Add 1 egg and salt into bowl and beat well. Set aside for later use.

Once the dough is lukewarm, start adding the 2 eggs and continue to mix until you have a smooth thick paste.

Spoon or pipe 12 mounds of dough onto the baking sheet, spacing a couple of inches apart. Glaze with the egg wash. Bake for 15 minutes and then reduce temperature to 350 degrees. Back for another 30 to 40 minutes until the shells are a nice amber color and when split are dry inside. Turn the oven off and, with the oven door slightly ajar, let the shells dry out for a further 10 to 15 minutes. Remove from the oven and let cool on a cooling rack.

For whipped cream, in a large mixing bowl place the whipping cream, vanilla and sugar and stir to combine. Cover and chill the bowl in the refrigerator for at least 30 minutes. When chilled, whip the mixture until soft peaks form.

To Assemble, split the pastry shells in half and fill with the whipped cream. Dust with powdered sugar if you want.

Baking Tips:

  • You don't have to fill the Choux Pastry with whipped cream. You can fill it with anything you would like. For example, chicken salad for a savory little sandwich snack.
  • You can put the bowl you are mixing the whipped cream in inside a bigger bowl filled with ice water to help speed up the process.
  • Make sure you don't over whip the whipping cream or else you will start to get butter.

Thursday, July 15, 2010

Checkerboard Cake

Categories: Cakes > Butter > Checkerboard Cake

At its core, a checkerboard cake is nothing but a cake, that when sliced into, resembles a checkerboard. It is nice for the wow factor, plus, if you have someone who can't decide which, between two types of cakes, to have - why not have them both with a checkerboard cake!


There are several different ways to make a checkerboard cake. The most common method is with a checkerboard cake pan set. This set includes 3 round cake pans and a plastic insert divided into 3 rings. You pipe alternating cake mix flavors or colors into the rings, remove the insert, and repeat with the next pan. However if you piped white, chocolate, white in the first pan, you would pipe chocolate, white, chocolate in the next. Keep in mind that you need thick batter so it doesn't start to bleed over when you remove the insert.

A second method of making a checkerboard cake is just like the first except you make a make-shift insert with cardboard covered in plastic wrap or contact paper. You can also make an insert for a square pan.

Another method involves simply piping the batter into a pan without an insert. With this method you will not get as straight a line but will work for the general effect. If you are looking for something a little wacky, this method works well.

The last method involves cutting two different colored or flavor cakes up and piecemealing them back together. This method is easier for square cakes than circles but still works well. If you cut you pieces with exact measurements, they should fix together almost like a glove. This is the method I used.

Recipe:

  • 1 Chocolate Cake Mix
  • 1 Yellow Cake Mix

For Chocolate Buttercream Icing:

  • 1 cup Shortening
  • 1 pound Powdered Sugar
  • 3/4 cups Cocoa Powder
  • 8 to 9 tbsp Water
  • 1 tsp. Vanilla
  • 1 tbsp. Meringue Powder


Follow the baking instructions on the cake mix box and bake each batch in 2 circle cake pan. Let the cakes cool. You should have 4 cakes when you are finished.

While the cakes are cooling, you can make the chocolate buttercream icing. Cream together shortening, water, and vanilla. Slowly add the rest of the ingredients and mix together on medium until thoroughly combined. If you want, you can add a pinch of salt, dissolved in the water, to cut some of the sweetness down.

To Assemble:

Measure the shortest height of all the 4 cakes. Level all four cakes to be that height. Stack one white and one chocolate cake together. Make sure the cake with the biggest circumference is on the bottom. Make sure the cake on the top is centered on the cake on the bottom.

It is best to cut rings out with the two cakes stacked together. That way you know your rings will be the same size and will fix back together tightly. With a serrated knife, cut at least 3 rings out with about a 2" width. You can cut out more rings if you would like but the smaller your rings are in width, the harder it is to cut them.

Once you have the rings cut out, reassemble them in alternating colors like shown below.


Once you have assembled the cakes, you will want to stack them 1, 2, 1, 2 with a thin layer of chocolate buttercream icing between each layer to make them stick. Use the remaining icing to frost the cake. You can decorate it however you would like. I chose to cover with white and bittersweet chocolate chips in a checkerboard pattern.

Wednesday, July 14, 2010

Pumpkin Pie

Categories: Pies > Sweet > Pumpkin Pie

Pumpkin pie is my favorite pie, but you know, I have yet to find a recipe that I like. You see, there is this chain fast food BBQ restaurant that has the best seasonal Pumpkin Pie and I am searching for a recipe that tastes like it. Sadly, this recipe was not it. However, since it wasn't terrible, I'll post the recipe here. Also, the crust for the pie was made from scratch.


Combination Vegetable Shortening & Butter Pastry - Pie Crust Recipe:


  • 2-1/2 cups Flour
  • 1 tsp. Salt
  • 1 tbsp. Sugar
  • 1/2 cup chilled Vegetable Shortening
  • 1/2 cup Unsalted Butter, cut into 1/4" pieces
  • 6 to 8 tbsp. Ice Water


Thoroughly combine flour, salt, and sugar. Add the vegetable shortening mix with a pastry blender. Scatter the butter pieces over the flour mixture and mix with pastry blender until butter bits are no larger than small peas.

Sprinkle 6 tablespoons of ice water over the mixture. Using a rubber spatula, fold to mix. Press down on the dough with the broad side of the spatula until the dough sticks together, adding up to 2 tablespoons more water if the dough does not come together.

Divide the dough into two balls and flatten each into a 4-inch dish. Wrap both separately in plastic wrap and refrigerate at least 1 hour before rolling. On a lightly floured surface, form pastry into a ball; shape into a flattened round. Roll pastry 2 inches larger than an inverted pie plate with a floured rolling pin. Fold pastry into quarter folds and ease into pie pan. Unfold and press it firmly against the bottom and side of the pan.

Pumpkin Pie Recipe:

  • 15 oz. (1 can) Pumpkin
  • 3/4 tsp. Ground Cinnamon
  • 1/4 tsp. Ground Ginger
  • 1/2 tsp. Salt
  • 14 oz. Sweetened Condensed Milk
  • 2 Eggs, Slightly Beaten


Preheat oven at 425 degrees. Mix pumpkin and spices together. Add remaining ingredients. Mix slowly just until thoroughly combined. Pour into pie shell. Bake for 15 minutes and then reduce heat to 350 degrees and bake for an additional 35 to 40 minutes. Thoroughly cool pie before serving.

Baking Tips:

  • Make sure not to pull and stretch your pie dough when rolling it. If you do, the crust will shrink when you bake it.
  • You can add 1/2 tsp. Nutmeg to the pie if you want.

Monday, July 12, 2010

Apple Pie

Category: Pies > Sweet > Apple Pie

Always popular is the Apple Pie. This apple pie isn't made from scratch so it only takes about 10 minutes to put together. Fast and simply. I'll add a homemade Apple Pie recipe from scratch later.


Recipe:

  • 2 cans Apple Filling
  • 2 Pie Doughs
  • Sugar


Preheat oven to 425 degrees. Unroll one of the pie doughs into a 8" to 9" pie pan. Gently press pie dough down so it molds to the pie pan. Spoon the apple filling into the pie pan. Unroll the second pie dough and cut it into 1/2" strips. Place strips on top of the pie in a lattice pattern. Fold the dough that hangs over from the bottom pie dough over the lattice design on the top sides of the pie. Use a fork to crimp the pie crust around the side. Sprinkle sugar over the dough on top of the pie. Cook pie for about 35 minutes until pie crust is a nice golden color.

Tips:

  • Wrap the sides of the pie crust in Aluminum Foil to keep it from getting too brown while the pie is baking. 10 minutes before the pie should be finished, remove the foil so it can get a nice brown color.

Funnel Cake

Category: Cookies > Other Others > Fried Cookies > Funnel Cake

When I started on my baking journey, I took requests from my family. Funnel cake was on the top of the request list and they didn't stop asking until I got around to making it.

Even though it is called a funnel cake, it is actually classified as a fried cookie.


Recipe:

  • 2-1/2 to 3-1/2 cups Flour
  • 2 tsp. Baking Powder
  • 3 Eggs
  • 1/4 cup Sugar
  • 1/2 tsp. Salt
  • 2 cups Milk
  • Powdered Sugar for dusting


You will need a funnel large enough to hold a cup of batter and a deep fryer or heavy skillet.

Sift 1-1/2 cups of the flour and the baking powder together. Mix the eggs, sugar, salt, and milk together. Add the flour and baking powder mixture and stir until smooth. Stir in more of the remaining flour until you have achieved the desired consistency—a batter thin enough to run through a funnel, but thicker than pancake batter.

In a deep fryer or heavy skillet, heat the oil to 375 degrees. Place you finger over the hole in the bottom of the funnel and add 1/2 cup batter. Hold the funnel close to the oil, remove your finger, and release the batter into the hot oil while making a circular motion. Fry until golden brown. Remove the cake and place it on paper towels to drain. Sprinkle with powdered sugar.